

Position so they Can’t Blitz Free:
Making either side of a player means they won’t have a free square to dodge straight out of, against low agility players this isn’t a problem as they aren’t likely to be dodging anyway. The issue with low agility players you are marking is that they are far more likely to try and blitz themselves free. This is also usually the case for AG3 players who have Block as well, as a block is going to often be easier than a dodge and has the bonus of perhaps injuring one of your players as well. If you position either side of them, then they can blitz one of your players and if they knock them over and follow up, then they are no longer marked by either of your players. You need to position in such a way that if they do that, then they will still be in the tackle zone of your other player if they follow up. This means that if they do try and blitz free, they will still have to try and dodge away regardless. Against high agility weak players this isn’t really a problem as they will often have a harder time blitzing you (especially the low strength ones) but are very good at dodging away.
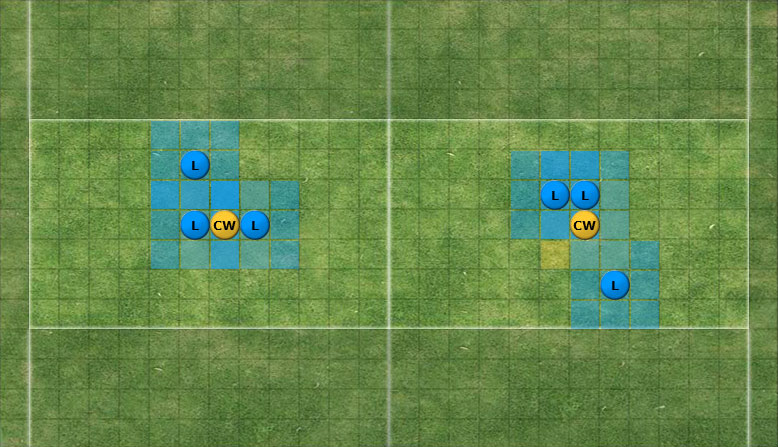
The diagram has Chaos Warriors in yellow, marked by Elf Linemen in blue, assume that the Chaos Warriors are both heading in opposite directions towards each end zone to score. The set up on the left the Chaos Warrior can just blitz the elf on the left to get free. If he knocks the elf over he can happily follow up so he doesn’t have to dodge away from the Elf to his right. If he doesn’t knock the Elf over, he just has to push the Elf to the side (upwards on the diagram) rather than straight ahead. Then he can attempt to dodge out in the opposite direction to get free. If he didn’t Blitz then he would have to try two dodges to get out, the first one being into a tackle zone as well.
The set up on the right, it is harder for the Chaos Warrior to break out and get to the end zone this turn. If he blitzes either of the two Elves marking him, then no matter what happens, he is still going to be in the tackle zone of the one he doesn’t hit. He could still do the blitz and have one dodge out into the open to get into the end zone, but there is no way he can avoid dodging like in the set up on the left. The third Elf in this set up means he can’t just dodge free to get away from both players marking him. Against players with lower agility he is of less of a priority as their odds of dodging is lower than an AG3 Chaos Warrior.
Marking so they Can’t Dodge Free:
To mark players who can easily dodge away from you requires a bit more thought and effort on your part. A lot of the time you can mark them as best you can and they still easily get away. This doesn’t mean you shouldn’t at least try though, every dice roll is a potential failure!
The things to consider are the fact that they can dodge and they are often fairly fast as well. They may also have a team mate to give the ball too as well, which lower agility teams are less likely to consider as an option. Even if you do force them to have to do a dodge through a tackle zone, you also have to consider that they could blitz one of your marking players to get a pushback which could free up an easy dodge away for the player you were marking. Due to this see if you can position where a team mate can’t blitz you away cause they can’t get a player there due to distance or too many hard dodges. If the player you are marking is a receiver set up to catch the ball, rather than someone who already has the ball, then the tackle zones can make the catch harder. They may decide to get the player free and move them to the end zone and try to get the ball to them there, rather than to give them the ball when in multiple tackle zones. If they elect to do that and fail to get the ball there, then you have a nice set up to blitz that player into the crowd!

As you can see from the diagram it is harder to mark more mobile players, though the basic premise is to sandwich them between two of your players. This means that whichever way they dodge they are going to have to go through a tackle zone and do two dodges to get totally free. A lot of the time they will probably still be able to just dodge away, but at least you made them try. As I already said they can blitz with a team mate to free up a route to get an easy dodge away. If they do that though, then that means they didn’t use the blitz elsewhere. If they only have one such receiver to mark then you can screen to make that really hard, or even use more than two players to mark up if you think you can spare more. Obviously using two players per receiver isn’t always going to be practical and will leave you weak elsewhere.
The two set ups on the left side of the pitch show the classic sandwich marking in the different orientations. The top one on the right hand side is very similar in that it still causes the same rolls for dodging free. If you don’t have enough movement to get right up next to them then this can make do. The disadvantage it has is that it only puts one tackle zone on the opposing player rather than two. That means it is easier for the other team to get the ball to them. They can also blitz away the one marking player, leaving them unhindered to receive the ball and then removing any need to dodge at all.
The bottom middle one looks similar and still has two tackle zones on the player to make getting the ball to them harder. It doesn’t provide any anti dodge cover though and they can just dodge out easily, if they have Nerves of Steel then this defence is rendered pretty ineffective.
The bottom right one is another variation that makes use of the sideline to still create dodges through at least one tackle zone to get to the end zone. They can still dodge out and run around the back, so for the really fast players this isn’t as good. If they aren’t really fast and are holding the ball rather than waiting for it, they can perhaps just dodge out the back and off load the ball to a team mate instead.
Good to see you back Coach
Great article, Coach, but one question: while you never state it outright, it seems from your examples that you primarily want to mark players when you’re on defense. How often do you mark players when you’re on offense?
The diagrams were as it was easier to explain those for defensive situations with some visual examples. For offence you don’t as desperately need to contain players like that. Combine that with the fact that protecting the ball is of a bigger concern, you usually aren’t going to have enough players to spare to be able to do it either.
You still want to mark certain players to at the very least cause them to do more dice rolls. You would rather not have a big guy ploughing into your cage for example, so sticking a Lineman on them will usually stop any without Break Tackle. Making the route harder to the ball carrier for the opposing sacking specialists is also worth while.
Excellent article, I will attempt to apply this stuff to my future games 🙂
Frenzy players deserve a mention. Marking them will help in stopping your players getting crowd surfed.
With good marking you can force them into multiple 1 dice or 1/2 blocks should they decide to blitz free of just throw a block.
Minotaurs can be dragged far, far away from the action with good marking, providing they dont eat the player you are offering up.
Thanks for that, you just gave away my play book.
This is still a concept many coaches struggle with. Just look at the discussions on troll being a crap player. Could you wish for better when marking a star saurus?
Actually, the by far most awesome marker is someone with the Iron Man (all injury rolls are only stunned) Handicap result from LRB 4. I recently had this on a Skink, and used this Skink to mark a Claw-RSC-Tackle-Multiblock Monster for half game.
THE classic chainpush is the one countering the “mark-the-non-agile-player-so-he-can’t dodge-out-easily” ploy:
1,2 -> elf linemen
B -> low AG ball carrier
1
2B
As you explained there’s no way B can blitz himself out of this without making a dodge. But with 2 extra players a chain push can be set up to free B.
H = helping player on B’s team
First fill the free square for the push with one of your players:
1
H2B
Next blitz 1 from above (L = blitzing player on B’s team):
L
1
H2B
Hopefully, he gets a push+knockdown making the situation like this (L follows up, P = prone player 1, meaning no TZ):
L
H2P
B
B has been pushed an extra square closer to the EZ and is free to move without dodging (another option would be to push 1 into 2 and 2 out of B’s tz).
Thank you very much for this article Coach, this was a very weak part of my game, especially the marking stronger ballcarriers like in your CW example. I’m sure I’ll come read again for a quick recap at some point.
Redvenom, thanks for your tips on Chainpushing to free up a low agility ballcarrier. Very helpful.
Coach, I think you should attempt to write an article on chainpushing at some point. For many inexperienced players like me it is something we never use or spot and very frustrating when a more experienced player uses it against you.